Thursday, March 21, 2019

A Day in Philadelphia!


Summer is right around the corner and that means it is time to go out and enjoy life! Bask in the warm weather as you travel around Center City to enjoy the beauty of Philadelphia in broad daylight. 

Image result for blue cross riverrink summerfest
Source: Visit Philly

There are many activities and fun events to do, but the first one is Blue Cross RiverRink Summerfest which is always a personal favorite with special features such as free admissions, a fun carnival, delicious food, and much more. It is located right on Columbus Boulevard and is hard to miss with the beautiful lights and lively people. If you’re looking to cross “fun activity” off your list, then look no further because this is it. 

Image result for rittenhouse square park photography
Source: Visit Philly
Aside from the wonderful Summerfest and the social atmosphere, Rittenhouse Square Park is another area that is more calm and peaceful which is perfect for taking a walk, having a picnic, or simply just to appreciate the goodness of nature. This wonderful park is located in Rittenhouse Square and is the perfect place for relaxation after a long day of stress. 

Related image
Source: Uwishunu
However, if you rather choose to be in a lively park, then Spruce Street Harbor Park would be a great combination after spending time at the Summerfest carnival. These two are within distance from each other, making the park hard to miss. Spruce Harbor paints a fantastical view with its vibrant lights that draws people in, immersing them in the imagery of colors that also change the emotions in their hearts. 

If you’re one for an adventure in the city, then check out one, if not, all, of these beautiful places which will leave an impression that will be unforgettable for life. 


Tuesday, October 17, 2017

πŸ–Š️ story time: my love for exo πŸ–Š️

hey guys. 
today, i want to share something personal with you all. 
 here is a piece that i wrote from a couple months ago. it is nowhere near perfect, but it is to me. 


[may 30, 2017]
[12:55 am.] 
exo, saranghaja. 

as the stars shine brightly in the vast sky, 
basking in the wonders of a new galaxy, 
the little particles slowly inch towards the moon, 
an object which holds the future for all. 

together they stand, forever they will shine, 
but one by one, they begin to disappear, 
vanishing into a different world, 
a world of new beginnings. 

the memories shared, the times spent, 
all will never be forgotten, or so they say, 
slowly but surely, the stars divide, 
shining bright in their own little ways. 

pondering the thought of true happiness, 
questioning the loyalty of their friendships, 
many disheartened, few to rely on, 
the stars must choose their own paths. 

will the stars shine together? 
will they crumble because of their own desires?

years passed, there is a new beginning,
the galaxy is gone, but never forgotten 
the lovely stars have moved on, 
yet some stay united. 

however, as the night goes on,
the twelve stars all glisten beautifully, 
they shine in the vast sky, 
individually but all together as one. 

μ—‘μ†Œ 

__
some may find this stupid. but whatever. 

exo is a korean-chinese boy band that debuted in 2012 and i, for one, developed a huge attachment and love for them. i was truly a fan and i loved their music. kris wu was my favorite member but sadly, he departed from the group in 2014. i was extremely sad. mock me if you want, but some things just can't be replaced. in this case, it was kris wu. at the time, he was my happiness. i don't even mean it in a creepy way! i supported him through everything and even now - with his collaboration with travis scott. but i wrote this poem for exo. 

the stars symbolizes the twelve members and the galaxy is kris wu. (many will get the reference). he was the leader of exo-m, a sub group apart from exo as well as exo-k. he was my everything. i watched exo showtime religiously and it felt like i was with them. i shared their memories and did everything with them. i just really miss ot12, that's the whole reason why i wrote this. 

i know most of the members are better off as they are now but you know, a reunion as ot12 wouldn't hurt a soul. 

exo saranghaja is their motto, if you will. exo is their band name and saranghaja is korean for "we are one." so, all together - exo, we are one. they stay united as one forever. μ—‘μ†Œ 
__
i wrote it in a text post as well! :)


__

as always, let me know if you have any questions or concerns and i'll be happy to help you. 

if you would like to follow me on social media, click on any of the links below. 

like my Facebook page! 
follow me on Twitter
follow me on Instagram
follow me on Pinterest

xx lovelies. 

Monday, October 16, 2017

πŸ‘— dressy with a hint of classy πŸ‘—

hey lovelies! 
today, i wanted to write a simple and short post about fashion!
look at this new dress that i got~


this dress is absolutely lovely. it's comfortable, soft, and best part? there's a pair of shorts underneath the flap of the dress! i bought this dress at madrag for only $25! it was so cheap and affordable. it was definitely worth it for the price. i topped it off with my michael kors selma bag in misty rose and a cute little dainty necklace from ross. i also wore crisscross wedge sandals with this outfit :) 

this dress is perfect for all seasons. for the fall and winter, it is possible to wear a pair of stockings with boots too! this dress also looks great with a cardigan. the possibilities are endless! i have a very hard time finding dresses because i'm especially picky with my clothing style, but this dress was calling my name and i just had to get it.


10/10! 

madrag is a great place to buy cute dresses and outfits that are currently in style! (: this dress made me feel very comfortable in my own skin. it helps hide my little tummy problem too! 

i also decided to try a new writing style in which i avoided all proper capitalization for this text post. does it look weird? should i stick to proper capitalization? haha. let me know! 

(I JUST REALIZED THAT I SAID THIS DRESS A LOT, BUT IT'S OKAY) 

as always, let me know if you have any questions or concerns and i'll be happy to help you. 

if you would like to follow me on social media, click on any of the links below. 

like my Facebook page! 
follow me on Twitter
follow me on Instagram
follow me on Pinterest

xx lovelies. 


sample time: πŸ‘‹ hello products πŸ‘‹

Hai lovelies! 


Today, I will be reviewing a sample I received from the Hello Product Company which is the Sensitivity Relief Fluoride Toothpaste with coconut oil. 


The sampling promotion has ended a while ago, so sorry!

Let's first start off with the packaging! 

I'm a big fan of minimalistic and tiny things, and the packaging did it for me. It's very simple yet effective. I also really like how they don't use capitalization??? It's really cute! The blue sky gives it an earthy feel, like hellooooo! (get it?) 

Next, the coupon! 

Very cute. It's exactly like the packaging box, but they added their information in the bottom right corner. I just want to say thank you so much for the coupon and I will definitely be using it to purchase more products. On the back is the manufacturer's coupon and the expiration date. 

And finally, the product!

The color of the toothpaste is modern and trendy - a beautiful rose gold copper finish. It's a sensitivity relief fluoride toothpaste - soothing mint with coconut oil. Fair enough. Well said, haha. On the back are the warnings, active and inactive ingredients. This company does not test on animals, so that's a plus. 

My thoughts 
The first time I used it, I thought it would be more refreshing and cooling for the mouth, but it was just normal and a bit dry. There is a distinct taste when you use it but all in all, I liked it! It's not as refreshing as I would like it to be, but it does the job :) It's not irritating, troublesome, nor does it burn anywhere. A very good product, in my opinion! 

I hope you enjoyed this blog post. Let me know if you have any questions or concerns and I'll be happy to help you.  

If you would like to follow me on social media, click on any of the links below. 

Like my Facebook page! 
Follow me on Twitter
Follow me on Instagram
Follow me on Pinterest


xx lovelies. 

✨ chrome nails with a hint of glitter & marble art ✨

Hey lovelies! Today, I'm gonna show you how I designed my nails. 


Before I get started, I just want to share that my mother is the owner of Lawncrest Nails in Philadelphia. Our Instagram is @_lawncrestnails if you want to follow our page! 

Okay, first off I only polished and designed my nails. It is very hard to do acrylic because I am not ambidextrous. I envy though who can though! I also only use gel polishes on my nails. 

I wanted to test out a couple different things on my nails so this was the end result! I hope you all like it. 


1. Apply nail polish primer on your nails. 
This step is crucial because the nail polish will shrink if there is not a base or primer applied on first. 

2. Cure for 15 seconds. 
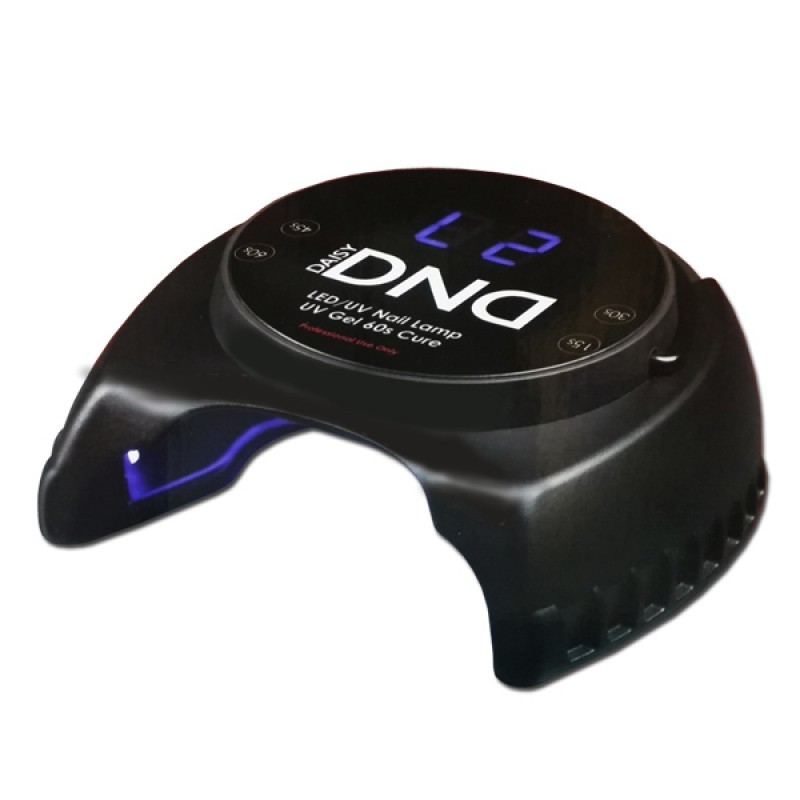
I didn't post mine because it was really dirty. Photo Credit: Affton Nail Supply
This is the machine that I used! I love it so much because it's so easy to use. However, you should wait until the timer runs out until you put your hand in the machine again. 

3. Polish your nails. 
I polished the white nails using Color Club's gel white polish in "French Tip." This polish is life. I love it!


Next, I polished the glitters using LeChat Nails' Perfect Match gel in "Hologram Diamond." This is a very popular glitter polish and I fell in love with it as well. 


Then, I polished the pink nails using Color Club's gel pink polish in "Kapow!" (Hahaha, I think that's a really funny name for a nail polish, but it does seem to have that effect.) 

Don't mind the 7, haha. 

4. Cure for 60 seconds. 
Sometimes, the polish may shrink if you wait too long to cure it. However, do not fret! After polishing two or three fingers, you can cure it for 60 seconds and then continue on :)

5. Apply the second layer of nail polish on all. 

6. Cure for 60 seconds. 

7. Apply Gel Top Coat Chrome on the white and pink fingers. 

8. Cure for 15 seconds. 
This step is crucial!!!! I can't stress this enough. If it is any longer than 15 seconds (in my opinion) it will not work. After 15 seconds, take your nails out. 

9. Apply the chrome powder onto your nails.
You can use a sponge or makeup wedge to apply the chrome powder. That's exactly what I did. I dipped my makeup wedge into the chrome powder and applied it onto my nails. I don't remember the chrome powder that I used for the white ones but it was definitely from the brand "Aora." For the pink nails, I used this chrome powder. This is most likely from the brand Aora too!


10. Cure for 60 seconds. 
I like to make sure that the chrome powder would stay onto my nails so I cure it. I feel like if I cure it, it'll be like a "good luck charm" or something, haha. 

11. Design the marble art!
I actually learned this technique from Tracy Nailz from Youtube! I'm gonna link the video that I learned it from right here. So, I did exactly what she did. In short, I applied black lines on the nail. Then, I dipped my brush in acetone and lightly tapped and swirled the lines to give it that marble effect. 


A closer view of my marble art! :) 
12. Cure for 60 seconds. 

13. Apply the jewels!
I used nail glue to apply the diamond onto my nail :) 

14. Top everything off with Gel Top Coat. 

15. Cure for 60 seconds.

16. Wipe off the excess.
Wipe off the excess with cotton and alcohol. Voila, you're done! 

I hope you enjoyed reading this mini tutorial. I will post more pictures below of my nails. 


This was my right hand! I think it looks great for a first try.  


I'm pleased with how they turned out. Let me know if you have any questions or concerns and I'll be happy to help you.  

If you would like to follow me on social media, click on any of the links below. 

Like my Facebook page! 
Follow me on Twitter
Follow me on Instagram
Follow me on Pinterest

xx lovelies. 


Monday, September 18, 2017

🌸 simple natural pinky makeup look 🌸

Hai lovelies. 

Today, I just wanted to share with you guys how I achieved this simple makeup look. 


These are all of the products that I used & I hope you learn something from this post :) 


1) Moisturize: St. Ives Timeless Skin Facial Moisturizer


First, I moisturized my face by using a moisturizer by St. Ives. I'm not exactly the richest girl in the world, so I buy whatever is convenient for me. Well, this moisturizer does the trick. It hydrates my face all day long and yes - my skin is softer but NOT as smooth as I thought it would be.

2) Face Primer: Smashbox Photo Finish Primer

Photo Credit: Sephora
Second, I used a primer to make sure that the foundation would stick to my face all day long. I currently do not have a picture of the primer, so here is one from Sephora :)

3) Foundation: L'oreal Infallible Pro Matte Foundation


Third, I used this foundation and along with my Real Techniques Beauty Blender. I carefully applied foundation on my entire face and blended it out with the beauty blender. In my case, I bought the foundation online so I wasn't exactly sure what my shade was. It was a guesstimate. Needless to say, it was a little lighter than what I expected (oops). I bought it in the shade "Classic Ivory." The foundation is alright, it cracks at a few places so I would not recommend it for those with dry skin. 

4) Concealer: Makeup Forever Full Coverage Concealer 

Photo Credit: Sephora
I only use concealer under my eyes because my dark circles are terrible! (Damn those late night study sessions at the library) I was unable to find my correct shade so I went to Sephora to get a couple free samples and turns out, my shade is #1. This coverage is amazing!! It really does cover my dark circles so I'm happy with it. However, one of my dark circles is darker than the other (does that make sense?) so it doesn't COMPLETELY cover my left eye but I'm not complaining. I also do not have a picture of this concealer, so thank you Sephora again for pulling through to help me, LOL. Also, I applied this concealer with the same beauty blender I used for my foundation!


5) Powder: Coty Airspun Loose Face Powder


Then, I used my E.L.F. Mineral Brush Powder to apply the power on my face. I got it in the shade translucent, but to be honest... it kind of made my face darker. It's not that darker, but I could tell there was a clear difference. Nevertheless, this affordable powder makes my face look very matte but also natural at the same time! 

6) Eyebrows: Three Products!


I tend to use three products for my eyebrows. I mix and match between the Anastasia Beverly Hills Dip brow Pomade and the Anastasia Beverly Hills Brow Powder Duo. For the dip brow, I got it in the shade "Chocolate" and for the brow powder duo, I got it in the shade "Taupe". I use a small angled brush from E.L.F. cosmetics to define my eyebrows with either of these products. Then, I tend to use this eyebrow pencil (don't know the brand or anything) to fill in any sparse spaces I have in my eyebrows. Finally, I use the concealer brush from E.L.F. as well (I love E.L.F.) to clean up the edges to make it look natural but fleeky :) 

7) Blush: Nars


I wanted to try out a different blush this time! I got it in the shade "Orgasm" (I kind of got it just because of the name) It is a very nice pink shade that looks nice on my own complexion. I applied this near the apple of my cheeks with a blush brush from E.L.F. Sorry if the product looks dirty! I've had it for a very long time. An oldie, but goodie. 

8) Eyeshadow: Urban Decay Naked 3 Palette


First, I applied Too Faced's Shadow Insurance on my eyelids. Then, I used the brush in the palette and slightly applied "Limit" all over the lids. Next, I applied "Nooner" on the outer 3rd of my eye (hope that makes sense). I went over near the middle half of my eye and applied "Dust" & "Buzz" together.

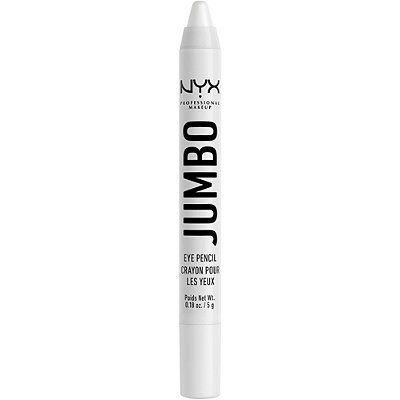
9) Inner Corner: Nyx Jumbo Eye Pencil 


Photo Credit: Ulta Beauty

To finish the look, I applied Nyx's eye pencil in the color "Cottage Cheese."

10) Eyelashes: Ardell Demi Wispies Natural Multipack 


I really love Ardell lashes. They look very natural, but they're also voluminous. I applied mascara on beforehand, curled my lashes, then applied my Ardell lashes. They last all day and I also get sooooooooooooo many compliments on them! Everyone loves them and these eyelashes are perfect. 

11) Highlighter: Mary Lou Manizer 

This highlighter is life. It's so affordable and it will make your skin look so healthy and glowy! I use a fan brush from E.L.F. to apply this highlighter above my cheeks, a little bit on my nose, nose bridge, chin, and a little bit on the forehead. I love this highlighter so much. I feel like this one is quite underrated but it shouldn't be! It's a great product. 

12) Lastly - Lips: E.L.F. Essential Lip Kiss Balms


I always tend to use different techniques when it comes to my lips. First, I applied Burt's Bees peppermint chapstick. Then, I applied the first lip balm in shade "Berry Sweet." Next, I applied a layer of the second lip balm in shade "XO Red." For the third layer, I applied another lip balm in the shade "Bare Kiss." After that, I used a paper towel to blot my lips. Finally, I applied a thin layer of Bare Kiss on my lips. I know it seems like a long process, but trust me... it's worth it. It keeps my lips hydrated and it's also long-lasting too! 

I guess that's all for now. I hope you enjoyed this blog post on how to achieve this simple makeup look! Let me know if you have any questions or concerns and I'll be happy to help you.  

If you would like to follow me on social media, click on any of the links below. 

Like my Facebook page! 
Follow me on Twitter
Follow me on Instagram
Follow me on Pinterest

xx lovelies. 


Wednesday, July 26, 2017

swagbucks 101: how i made $1,348 as a high school student


As a young teenager, I was bored at home and had nothing to do. I wanted to find something that would keep me entertained. Eventually, I pulled out my laptop and searched on Google, "How To Make Money Online." Then, I discovered Swagbucks. 

Photo Credit: warriorforum.com | Mr. Ken Russell


What is Swagbucks, you may ask? 

Well, Swagbucks is an online website that allows you to earn rewards for what you're already doing - searching the web, watching videos, playing games and more. It was actually the first website I used to make money online as a high school student. SB is a term coined for the amount of money you earn on Swagbucks. For example, 100 Swagbucks is equivalent to $1 US dollar. 300 Swagbucks? $3. 500 Swagbucks? $5. You get the drill. So, after learning the basics, I will tell you how I used Swagbucks to make money online.

First things first - Sign up!
I think the signing up process is pretty self explanatory. Enter your email address or you can use Facebook to create your account. If you use a referral link, you could earn some extra SB when you sign up. However, here's the catch that no one tells you: If you use someone's referral link, they will earn 10% of your earnings for life. What does this mean? I'll provide a picture here. 


Photo Credit: Swagbucks
You can choose to use my referral link if you like or you don't have to. It's all up to you. My job is to inform you of ways to make money online, not to scam you. That being said, click here if you would like to use my referral link :) 

1. Earn SB with Web Search
Photo Credit: Swagbucks

When I was using Swagbucks, I searched almost anything to earn SB. The SB prizes range from 6 SB to over 30 SB (at least for me). Even if I searched over 100 times, I only received rewards for actually searching 4 times. I know it sounds tedious, but as a high school student, what did I have to lose? If you win SB for searching the web, you would have to answer a Captcha code to prove that you're not a robot, of course. Here are some pictures below that I found on Google that shows users earning SB for searching the web. 
Photo Credit: Swagbucks

Photo Credit: easybeermoney
Photo Credit: mmo4teen
2. Earn SB with Swag Codes

Photo Credit: Swagbucks

You can also earn SB by entering in Swag Codes. Swag Codes are reward phrases that can be found online such as Swagbucks' Facebook, Twitter, and Pinterest. There's also a website that's dedicated all to swag codes! I check this website a lot for swag codes updates. Make sure to enter them in before they expire. Tip: Swagbucks gives out lots of swag codes when there's an event or holiday coming up - (Halloween, Christmas, New Years).

3. Do the Daily Poll! 
Photo Credit: Swagbucks 
You just answer a question that Swagbucks asks every day and you'll be sure to earn at least 1 SB a day. 

4. Do the Surveys. 
Surveys are very effective because you can more than 200 SB for one survey. You will have to see if you quality for the survey first then you will be able to answer the survey. Tip: the 36 SB surveys are usually quick and easy! The same goes for the 48 SB surveys. 72 SB surveys are a bit harder but if you answer everything truthfully and correct, then you could earn 72 SB too! The 180 SB surveys are rare. I always get disqualified for them. If you qualify and earn SB for doing them, then good for you because I was never able to (well, maybe at least once or twice but that was it). 

Photo Credit: Swagbucks
Peanut Lab Surveys ARE GREAT. THEY WORK THE BEST. Gold Surveys, (in my opinion suck because they never work for me). Each survey tells you how much you can earn and how long it will take you to finish it. Then it's up to you to decide whether or not you want to do them :) 

5. Earn Money for PLAYING GAMES. 
To be honest, I only play the free games. I also suck at games, so I rather not lose any money if I actually bet anything. 
Photo Credit: Swagbucks
These three games are free and you can play them every day to earn SB! You're honestly earning money to play games, come on. Testing it out wouldn't hurt. My favorite is the second one, even though I get frustrated a lot with it. All in all, these three games are really really fun to play! Tip: Make sure you enable Adobe Flash Player in order to play these games. 

6. Watch Videos Online & Earn Money. 
Frankly speaking, Swagbucks has definitely changed ever since I used it back in 2013. But watching videos online and on your phone helps you earn SB. 
Photo Credit: Swagbucks' Blog
Back then, you were able to earn at least 100 SB using the second app with the green play button. You were also able to earn 120 SB with the pink app with the star button. Sure, it took a while, but it was definitely worth it in my opinion. It took me at least half an hour for the first one and an hour for the second one. I don't know the exact times or calculations or any of that, but I'm just letting you know what I did from experience. 

First Row: second one (SBTV Mobile), third one (EntertaiNOW)
Second Row: first one (Lifestylz.tv), second one (Sport.ly) - I don't know what the other two are. 

But now, according to Swagbucks' blog, you can earn up to 36 SB a day for SBTV Mobile, 18 SB a day for EntertaiNOW, 18 SB per day for Lifestylz.tv and 18 SB per day for Sport.ly. (In my opinion, the SB rewards decreased a lot). 

Anyways, you can also earn SB by watching the videos from the actual website. You can let them play while you go do something else. Tip: Stay on the page. 

Photo Credit: Swagbucks
They have a variety of videos on Swagbucks. You can watch whatever one you like based on your own preference. 

YOU ALSO CAN EARN LOTS OF SB BY WATCHING THIS!
It's listed under Sponsored Videos but man! You can earn a lot of SB by doing just this one alone. 

One time, I didn't do anything else and I just decided to do this guy for a couple hours. (That sounds wrong, but you get the gist!) You click on him, you watch a sponsored video for 30 seconds to 2 minutes and then you earn 2 SB. That's it. IT'S SUPER QUICK. Imagine if it was 30 seconds per video. You earn 4 SB in one minute. 20 SB in 5 minutes. Either way, if you see this guy, be sure to watch the videos! 

7. Other Ways to Make SB
If you reach your daily goal, you can earn bonus SB. 

Photo Credit: Swagbucks

You can also earn SB by using coupons and online shopping. 
Photo Credit: Swagbucks

HOWEVER, I didn't talk about these two because I didn't do them myself. Feel free to explore and use coupons and online shop to earn more, but I felt like it was too much of a hassle which was why I opted out from doing them. 

My Thoughts on Swagbucks
I started Swagbucks in 2013. I used it for 3 years and I quit in 2015 because high school was ending and I was getting ready for college. Was it worth it? Personally, it was for me. I was young and I had an extra $1,348 in my pockets. I definitely wasn't complaining. However, it took me three years to get that amount of money. For others, I'm sure they can earn that in a year. But then again, I'm not complaining at all. I knew the tips and tricks to earn more and I utilized them to the best of my ability to earn SB. All in all, Swagbucks is a legit website where you can earn SB online. I hope that my review on Swagbucks helped you. 

Still don't believe me? Here's proof of my rewards.


Of course, I can't post all of my rewards. If you look at the bottom, there's twenty pages that consists of my rewards (that are all Amazon, by the way - I love Amazon). I posted two to show you when I used Swagbucks - 2013-2015. 

In addition to making money using Swagbucks, I donated money to the charities that I love and wanted to help them. 


I love Swagbucks. I really do. I'm proud to say that I've tried it out and it has helped me out a lot. I have tried to tell others about this platform before but they merely scoffed at the idea simply because they thought the name was foolish and silly. But it's okay. It was their loss because I invested in lots of time and energy and in return, it was all worth it. 

Let me know if you have any questions or concerns and I'll be happy to help you! If you would like to follow me on social media, click on any of the links below! 

Like my Facebook page! 
Follow me on Twitter
Follow me on Instagram
Follow me on Pinterest